How to Setup IceRiver AE2 and AE3: Step-by-Step Guide for Aleo Mining with Troubleshooting and Optimization
Introduction: The Definitive Aleo Mining Guide for Beginners and Experts
Setting up your IceRiver AE2 or IceRiver AE3 ASIC miner for Aleo mining doesn’t have to be complicated. This comprehensive guide walks you through every step of the process, from unboxing to optimizing performance. Whether you’re new to ASIC mining or upgrading your existing setup, you’ll find everything you need to get your miner running efficiently on the Aleo network.
As someone who has personally set up dozens of these miners for both small and large-scale operations, I’ve encountered nearly every possible challenge in the process. When I first unboxed my own AE0 early this year, I spent hours troubleshooting connectivity issues that could have been solved in minutes with the right guidance. This guide compiles all those hard-earned lessons to save you time and frustration.
What Are IceRiver AE2 and AE3? Understanding These Revolutionary ASIC Miners
Comparison with Other Mining Solutions
Unlike general-purpose GPU mining, these ASIC miners offer several distinct advantages for Aleo mining:
| Feature | IceRiver AE2 | IceRiver AE3 | Typical GPU Mining Rig (6 GPUs) |
| Hashrate | 720 MH/s | 600 MH/s | 600-720 MH/s |
| Power Consumption | 1300W | 1000W | 1000-1300W |
| Efficiency | 1.8 J/MH | 1.67 J/MH | 1.6-1.8 J/MH |
| Setup Complexity | Minimal | Minimal | High |
| Space Required | Small | Small | Large |
| Noise Level | 60dB | 55dB | 65-75dB |
| Initial Investment | $4199 | $3499 | Higher |
According to a study by the Cambridge Centre for Alternative Finance, specialized ASIC miners like the IceRiver series typically offer 10-100x better energy efficiency than general-purpose computing hardware for cryptocurrency mining. This translates directly to lower operational costs and higher profitability.
Pre-Setup Checklist
Before diving into the setup process, gather all necessary components and information to ensure a smooth installation. Having everything prepared will save you time and prevent frustration during the configuration process.
Required Hardware
Your IceRiver AE2 or AE3 miner requires specific hardware components for proper operation. The miner itself should come with basic cables, power supply unit (PSU) already integrated in the miner, so no need to buy extra PSU. It is better to specify the types of cable for US standard when you order the miner, but just in case you don’t get the proper cable, you can find an adaptor in the walmart closeby.
Network Requirements
A stable internet connection is essential for consistent mining operations. Prepare an Ethernet cable to connect your miner directly to your router or network switch. Wireless connections are not recommended for mining due to potential stability issues.
Mining Pool Information
Select a mining pool before beginning setup. Popular Aleo mining pools include Dxpool, Whalepool, and F2Pool. From your chosen pool, you’ll need the stratum URL (server address and port), which typically follows a format like “stratum+tcp://aleo.example-pool.com:4444”.
Each pool offers different advantages:
| Pool Name | Fee Structure | Minimum Payout | Server Locations | Unique Features |
| DXPool | 3% fee | 0.05 ALEO | EU, US, ASIA | Real-time statistics, PPLNS payment system |
| Whalepool | 1% fee | 0.1 ALEO | EU, US | Low minimum payout, detailed worker stats |
| F2Pool | 2% fee | 0.2 ALEO | Global network | Established reputation, multi-coin platform |
Wallet Address
Create an Aleo wallet to receive your mining rewards. Aleo wallet addresses follow the format “aleo1…” and must be verified before entry into your mining configuration. Double-check your wallet address, as incorrect entries will result in lost mining rewards.
Several wallet options exist for Aleo:
- Official Aleo Wallet: The most secure option, available through the Aleo website
- Exchange-provided wallets: Convenient but less secure for long-term storage like Coinbase.
- Hardware wallet integration: Some hardware wallets are beginning to support Aleo
I recommend creating multiple wallet backups stored in different physical locations. During a power outage last winter, I nearly lost access to my mining rewards because I had only digital copies of my wallet information.
Unboxing and Hardware Requirements: Setting the Foundation for Mining Success
When receiving your IceRiver AE2 or AE3, it’s important to follow proper unboxing procedures to ensure all components are accounted for and undamaged. The packaging is designed to protect the sensitive electronic components during shipping.
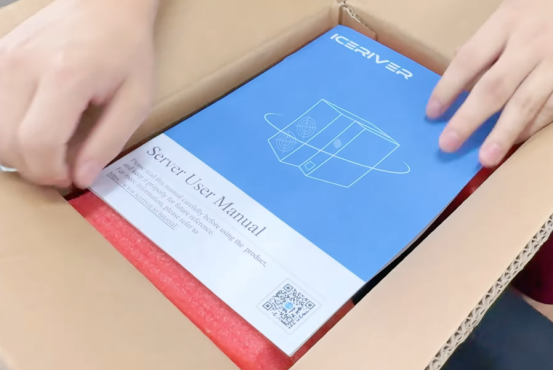
What’s in the Box
Upon carefully opening your IceRiver Miner package, you should find:
- The main miner unit with power supply unit (AE2 and AE3 are PSU intergrated)
- AC power cord appropriate for your region
- Quick start guide with basic setup instructions
- Warranty card and quality control certification
- QR code linking to comprehensive online documentation
Additional Equipment You’ ll Need
For optimal operation, you’ll need to supply several additional components:
Networking equipment: A Cat5e or Cat6 Ethernet cable (minimum 3 feet/1 meter) to connect the miner to your network router or switch. While the miners don’t require particularly high bandwidth (typically using less than 10MB per hour), a stable internet connection with 99.5%+ uptime is essential for consistent mining operations.
Wifi Antenna: If you want to connect AE2 or AE3 with Wifi, you will need to prepare a wifi antena.
Power and Environmental Requirements
The miners operate on standard household power (200-250V), so no special electrical installations are required. However, calculating your power consumption is important for profitability considerations:
AE2: 720W × 24 hours = 17.28 kWh per day
AE3: 600W × 24 hours = 14.4 kWh per day
For optimal performance, maintain an ambient temperature between 15-30°C (59-86°F) with relative humidity below 65%. While the miners can operate in temperatures up to 40°C (104°F), efficiency decreases and component lifespan may be reduced at higher temperatures.
According to the U.S. Department of Energy, electronic devices operating in environments 20°C above their optimal range can experience up to 40% reduction in lifespan. Investing in proper cooling and ventilation can significantly extend your mining hardware’s operational life.
Powering On Your Miner: First Steps to Mining Success
Setting up your IceRiver miner requires careful attention to proper placement and connection procedures to ensure optimal performance and longevity of your investment.
Optimal Placement Considerations
Begin by selecting a location with the following characteristics:
- Good ventilation: Natural airflow or mechanical ventilation helps dissipate heat
- Minimal dust: Dust accumulation can impede cooling and increase internal temperatures
- Stable surface: The miner should be placed on a flat, stable surface that won’t vibrate
- Clearance: Maintain at least 6 inches (15cm) of clearance on all sides
- Away from water sources: Avoid areas with high humidity or risk of water exposure
- Limited noise sensitivity: While quieter than many miners, consider the operational sound
- Access to power and network: Positioned within easy reach of electrical outlets and network connection
Research by the American Society of Heating, Refrigerating and Air-Conditioning Engineers indicates that electronic equipment in well-ventilated environments with consistent temperatures can experience up to 30% longer operational lifespans compared to poorly ventilated locations with temperature fluctuations.
Connection Procedure
Follow these steps to properly connect your miner:
- Power connection: Connect the included power cord to the miner’s power input socket, ensuring it’s fully seated. Then connect the other end to a grounded electrical outlet. If possible, use a surge protector or uninterruptible power supply (UPS) to safeguard your investment against power fluctuations.
- Network connection: Connect one end of your Ethernet cable to the miner’s network port (RJ45 connector) and the other end to your router or network switch. Ensure the connectors click into place securely at both ends.
- Verification: Before powering on, double-check all connections and ensure adequate clearance around the unit.
Power-On Sequence and Indicator Light
When you power on the miner by pressing the power button (located on the side for the AE2 and AE3), observe the LED indicators:
- Power LED (typically green): Should illuminate immediately, indicating the power supply is functioning correctly.
- Status LED (typically blue): Will begin blinking as the system boots up. This process takes approximately 30-60 seconds, after which the status LED should remain solid, indicating the system is fully operational.
- Hash rate indicator LEDs (typically yellow): These will begin to light up sequentially as the miner starts processing. On the AE0, you’ll see 5 LEDs representing 20% increments of maximum hashrate. The AE2 and AE3 features 10 LEDs representing 10% increments.
- Network LED (typically green/amber): Located on the Ethernet port itself, this should show solid or blinking lights indicating network connectivity.
This visual feedback helps confirm your miner is functioning correctly. If you don’t see these expected LED behaviors, check all connections and ensure power is being supplied properly.
Finding Your Miner’s IP Address: Essential Network Discovery Techniques
Before you can configure your miner, you need to locate its IP address on your network. This step is crucial as it allows you to access the web-based management interface. There are several methods to accomplish this, ranging from beginner-friendly to more technically advanced approaches.
Using IceRiver IP Reporter Tool (Recommended Method)
The most straightforward approach is using the official IceRiver Miner IP Reporter Tool, which is specifically designed to detect IceRiver miners on your network:
- Download the tool: Visit the official IceRiver website (iceriver.io) and download the IP Reporter Tool appropriate for your operating system (Windows, macOS, or Linux).
- Extract the files: After downloading, extract the compressed file to a folder on your computer. The extraction process varies by operating system:
- Windows: Right-click the ZIP file and select “Extract All”
- macOS: Double-click the ZIP file to extract
- Linux: Use the command unzip filename.zip in terminal
- Run the application: Navigate to the extracted folder and run the application:
- Windows: Double-click the .exe file (you may need administrator privileges)
- macOS: Double-click the .app file
- Linux: Make the file executable with chmod +x filename then run with ./filename
- Scan results: The tool will automatically scan your network and display all connected IceRiver miners with their:
- IP address
- MAC address
- Model number
- Firmware version
- Current hashrate (if mining)
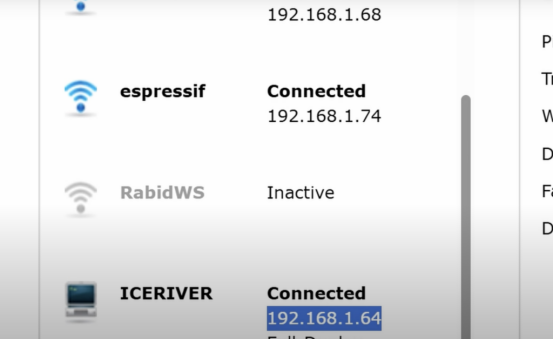
- Note the IP address: Record the IP address shown for your miner. This will typically be in the format 192.168.x.x or 10.0.x.x depending on your network configuration.
This tool is the most reliable method for finding your device as it uses specific protocols to identify IceRiver miners on the network.
Via Router DHCP Client List (Alternative Method)
Another approach is checking your router’s DHCP client list, which shows all devices that have been assigned IP addresses:
- Access router admin panel: Open a web browser and enter your router’s IP address in the address bar. Common router addresses include:
- 192.168.0.1
- 192.168.1.1
- 10.0.0.1
- If unsure, check the label on your router or consult your internet service provider’s documentation.
- Login credentials: Enter your router’s admin username and password. If you haven’t changed these, they may be the default credentials (often printed on the router or in its manual).
- Navigate to connected devices: Different router manufacturers place this information in various locations:
- Netgear: Look under “Attached Devices” or “Device Manager”
- TP-Link: Check “DHCP Clients List” under DHCP settings
- Asus: Navigate to “Network Map” and view connected clients
- Linksys: Find “DHCP Client Table” in the Status section
- Identify your miner: Look for a device named “IceRiver” or “IceRiver-AE2” or “IceRiver-AE3” in the list. Alternatively, check for the MAC address printed on your miner’s label (a 12-character code in format XX:XX:XX:XX:XX:XX).
- Note the IP address: Record the corresponding IP address shown next to your miner’s entry.
This method works well if you have access to your router’s administration interface and is particularly useful in home or small office environments.
If these methods don’t work, use a general network scanner like Advanced IP Scanner or Angry IP Scanner to scan your entire network and identify new devices. The miner will typically have open ports that these scanners can detect.
For static IP configurations where DHCP isn’t available, you’ll need to temporarily connect the miner directly to a computer using an Ethernet cable and configure its network settings through the default IP address (typically 192.168.1.254 or as specified in the manufacturer documentation).
Accessing the Web Interface: Your Control Center for Mining Operations
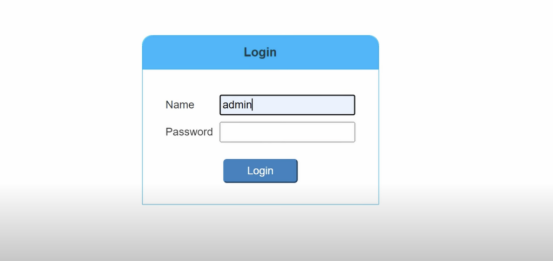
Once you have identified your miner’s IP address, you can access its web-based management interface, which provides complete control over all aspects of your mining operation. The default login credentials for IceRiver miners are typically:
- Username: admin
- Password: 12345678
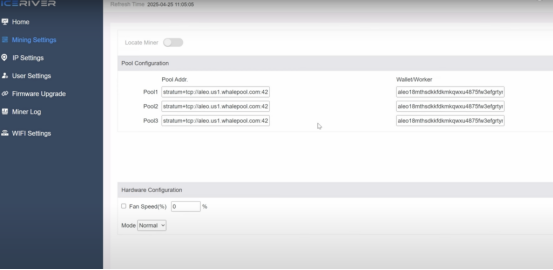
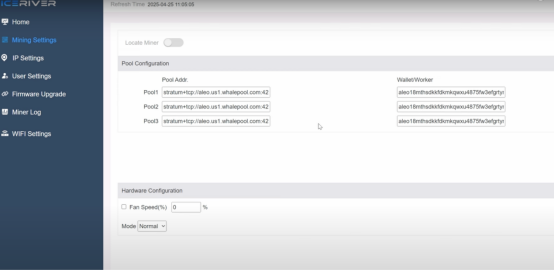
Enter Mining Pool information (Workername & Pool URL)
After Entering the The IceRiver web interface, go to the mining settings page and enter your pool address and workername.
For the mining pool, we recommend few options below:
- Dxpool
- F2pool
- Whalepool
Check Mining Pool Stats to choose an Aleo pool.
- Let’s take the Whalepool for illustration here. You can Register an account with Whalepool on their website and find the Aleo mining tutorial page, and there you can find the aleo mining pool url addresses
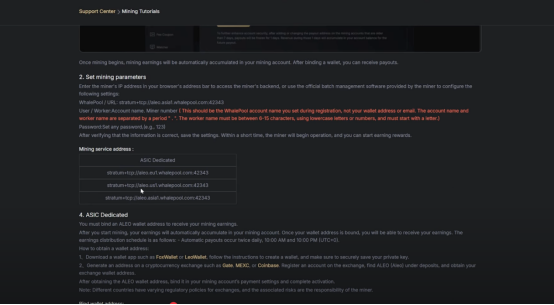
- If you’re in the US, you can copy that mining pool and paste it into pool address 1, and you can copy the other region addresses as backup pools on pool addresses 2 and 3.
- Once you are done with your pool addresses and wallet name, the next is the password. It can be anything of your choice.
- After entering all the details, hit save.
Start Mining Aleo
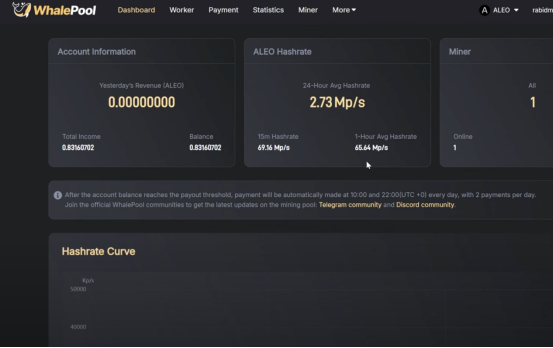
You can see your Iceriver AE2 is connected to your preferred Aleo mining pool and started mining Aleo.
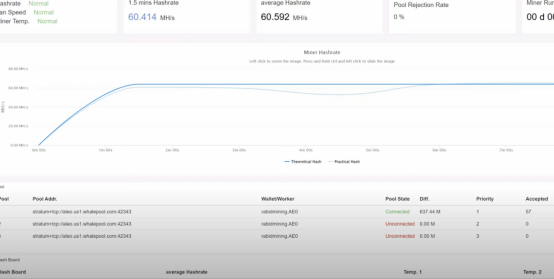
You can also check the mining status and mining rewards from your aleo mining pool dashboard in real-time.
CONCLUSION
IceRiver is a well-known brand in the crypto mining industry. Its recent launch, IceRiver AE2 and IceRiver AE3, are super energy efficient options for mining Aleo. The miner comes with an excellent hash rate, energy efficiency, and low power consumption. Additionally, its compact size and reduced noise level make it ideal for home mining as well. If you’re into Aleo mining and considering an ASIC miner, you should give a try on those two miners. In case of any issue, you can always give a call to BT-Miners and setup a tech meeting. Our team can assist you to solve your problem.